Unknown's avatar

About stevenmbeard

I am the chair of Musselburgh Camera Club, and also a software engineer at the UK Astronomy Technology Centre in Edinburgh.

28 February 2019 (Set Subject Competition – Abstract)

This week we had the second of our 3 set subject competitions, following on from the “Seascapes” competition, which took place in October 2018. The competition was judged by Mike Clark, who won the “Movement” competition last year. Mike began the evening by showing us the definition of abstract photography, which he would be using to judge the images. He also showed us a collection of his own abstract images, which would also have been strong contenders in this competition.

Members submitted a total of 39 images. The “abstract” subject gives members a chance to be creative in their work, and Mike said he had been inspired to try some of the ideas. Images included a spectacular arrangement of oil drops on water, streaks of light, creative collections of everyday objects viewed from unusual angles, reflections, bubbles, striking rock formations, unusual landscapes, lighting displays, strange portraits taken through glass or cloth and a glowing neon tiger. One images which stood out from the rest was a spectacular macro image of water droplets covering the centre of a flower, by relative newcomer Sandra Crowhurst. Well done Sandra, you nailed it with that image! Mike was baffled how some authors achieved their effects, and there was a lot of discussion during the tea break.

The top scoring images were:

  • Water Droplets (Sandra Crowhurst) – 20 points
  • Glacier Nebula (Jim Tod) – 19 points
  • Bubs (Kevin Johnston) – 19 points
  • Emergence (Jim Tod) – 18 points
  • Winter Gloaming at Luskentyre (Jim Tod) – 18 points
  • Riveting (Gordon Davidson) – 18 points
  • Pine Cone (Sean Conner) – 18 points
  • Resting Place (Steve Barber) – 18 points

Jim Tod stole the show with a great set of 3 images, but it was the 17-point images which made a difference to the rest of the placings when the scores were added up. Steven Beard achieved 3 x 17, Jennifer Davidson achieved 2 x 17, and Lorraine and Malcolm Roberts each had one 17 point image. The highest total scores were:

The highest scorers were:

  • 5th place (48 points)
    • Malcolm Roberts
  • 4th place (49 points)
    • Jennifer Davidson
    • Sean Conner
    • Sandra Crowhurst
    • Kevin Johnston
  • 3rd place (50 points)
    • Gordon Davidson
    • Steve Barber
  • 2nd place (51 points)
    • Steven Beard
  • 1st place (55 points)
    • Jim Tod

The winner normally wins the privilege of judging next year’s competition, but as Jim Tod also won the “Seascapes” competition and is already judging next year, the task falls to me in second place.

The set subject trophy will be won be the member who has the best combined score from their best two competitions. The league table after two competitions looks like this:

  • Jim Tod (57 + 55 = 112)
  • Steven Beard (51 + 51= 102)
  • Gordon Davidson (51 + 50 = 101)
  • Steve Barber (50 + 50 =100)
  • Joe Fowler (54 + 44 = 98)
  • Mike Clark (49 + judging)
  • Jennifer Davidson (47 + 49 = 96)
  • Malcolm Roberts (47 + 48 = 95)
  • Kevin Johnston (43 + 49 = 92)
  • Sandra Crowhurst (42 + 49 = 91)
  • George Todd (45 + 46 = 91)

Jim Tod is way ahead, but only a few points separate the rest. Entries for the 3rd competition “street photography” are open now. George has extended the entry deadline by a few more days, so if you would like to enter please send 3 JPEG copies (scaled to 1600 pixels on the largest side) to George (georgetodd1957@me.com) this weekend. The deciding competition takes place on 21st March 2019.


SPF Print Championship 2019

For those interested, the Scottish Photographic Federation Print Championship takes place tomorrow (17th February 2019) at the Stirling Court Hotel, Stirling University, Stirling FK9 4LA. The ticket desk opens at 9:30am and the competition finishes at 4:30pm. If you haven’t already found the information, here is a link to the details on the SPF web site:

https://www.scottish-photographic-federation.org/spf-print-championship

A timetable of the event is available at the following link:

Click to access print_championship_timetable_for_the_day_2019.pdf

14 February 2019 (Match That Image)

On 14th February 2019 we hosted North Berwick Photographic Society for a “Match-an-Image” evening. This is a competition format we have not tried before, and it turned out to be great fun. Each team brings along a bank of 40 images. Teams in turn display one image, and the other team tries to match it with a similar image. Points are scored when the other team can’t find a match, or when the judge declares that your team have the best matching image.

The competition was judged by Joe Fowler, who tried hard to be unbiased even though he came from Musselburgh and had to judge several of his own images! This was an informal competition where banter and comments are encouraged. At one point the audience were astonished that an image of a herd of elephants was judged to be a match to juggling man dressed as a monkey! Well, they both have an animal theme.

North Berwick are masters at this competition, and matching their images turned out to be a lot harder than anticipated. Musselburgh had a few lucky breaks, but North Berwick had a really devious collection of opening images, and in the end North Berwick won by 33 points to 24. We learned a lot about the competition tactics by watching North Berwick, and we should be able to give them a closer competition next year. Some obvious changes we need to make next year are:

  • Make sure our team sits in a place where they can actually see the screen.
  • Print out some thumbnails of your images so you can actually see them.

It’s little things like this that make all the difference.

7 February 2019 (Audio Visual Evening)

On 7th February 2019 we had our annual audio visual evening with Beeslack Penicuik Camera Club. The evening began once the elephant dancing class in the upstairs room had finished and our projector had stopped shaking. Musselburgh Camera Club kicked off with a presentation on the history of flight, leading to the Apollo moon landings in 1969 (with 2019 being the 50th Anniversary). Beeslack showed a presentation on the history of Glencourse Barracks (which will sadly be closing in in a few years) and a presentation on the history of the National Museum of Flight at East Fortune, which nicely contrasted with Musselburgh’s earlier presentation. Musselburgh then showed a presentation on how to make a presentation, which described the whisky-making process at the Highland Park distillery in Orkney. The evening finished with a moving tribute to John McCrae and an atmospheric abstract presentation mixing images of trees in the Scottish landscape with calming music. Once again, it was a pleasure to host Beeslack and share our audio visual projects.

31 January 2019 (How Did You Do That)

This week members shared their image processing hints and tips, revealed how to make some special effects or brought in questions to be answered. Here are some highlights from the discussion.

Removing unwanted objects.

Quiet often an image will lose marks because of a distraction in the background or a bright spot near the edge. The easiest way to remove the distractions is to crop the image, but what if you can’t? If cropping the image would remove something important, the other way to remove distractions is to used the “patch”, “clone stamp” and “healing brush” tools in Photoshop. The patch tool is great for removing distracting objects against a plain background (such as sky, grass or water). Look for the tool that looks like a sewn patch as shown here.
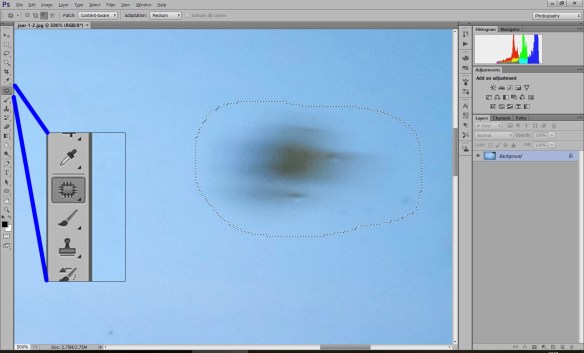
Make a selection around the object you want to remove, click in the middle and drag the patch somewhere else in the plain background. When you release the mouse the object will be removed. If your background has a pattern, such as waves or stripes, line up the pattern as best you can before releasing the mouse. Hint: You can remove a large or oddly-shaped area by patching it a bit at a time.

The clone stamp tool can be used for trickier patching jobs, like the image below. Select the tool looking like an ink stamp. Move the tool to an area you would like to copy and click while pressing the ALT key. Then move the tool to the place you would like to erase, line up the edges and start painting.
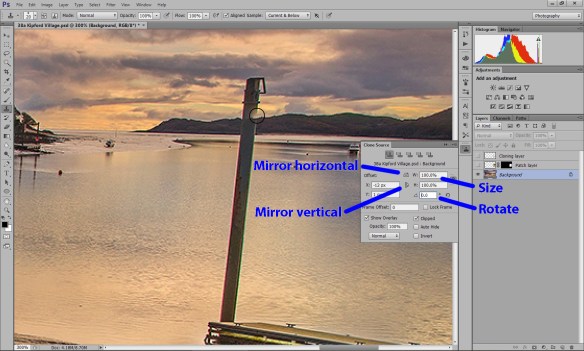
The “clone source” window (above) can help you to match the edges. If you are copying the top of the mountain but it is at the wrong angle, try changing the rotation. If you are cloning a background with a gradient, use the “Mirror horizontal” button to flip the gradient so your painted strokes don’t leave a sharp edge. Here are some more cloning hints:

  • After cloning, go over the same area with the healing brush to smooth over the edges and remove artefacts. Look for discontinuities and unnatural straight edges.
  • Try to clone from many different sources to avoid creating repeating patterns. When you have finished, look for duplicated objects and similar patterns and change the duplicates by passing the healing brush over them.

Local Tone Corrections

We have all been told to use the “brightness”, “levels” or “curves” tools in Photoshop to adjust the brightness and contrast, but what if your image only needs a partial correction? “camera raw” comes with a selection of very useful adjustment tools. The first is the “gradient tool”, shown below. First select the adjustment you would like to make (in this case a reduction in exposure and darkening the highlights) and then sweep with the mouse away from the part you would like adjusted (in this image from bottom to top). The adjustment darkens the foreground highlights.

The second is the “adjustment brush” shown below. This tool uses exactly the same sliders as the gradient tool, only this time you can paint the adjustment anywhere on the image. Ticking the “auto mask” box prevents the adjustment accidentally leaking across a sharp edge. Hovering the mouse over the point reveals which parts of the image have been painted over (as shown below in red).
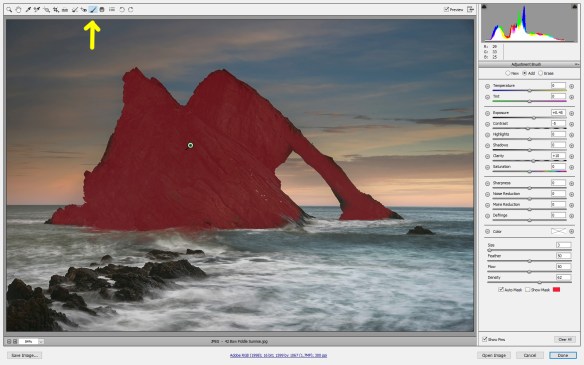
This adjustment is particularly useful for brightening the faces in a portrait or for darkening bright distractions near the edge of an image. The secret is to make only small adjustments so your image still looks natural. You can change the adjustment at any time.

Content Aware Scale

The content aware scale is a little used Photoshop utility (which has been available since CS4)  but its results can be absolutely magic. It is ideal for compositions with several subjects spaced out against a plain background. If you would like to bring the subjects closer together, or to change the aspect ratio of the image without cropping it, a content aware scale may work for you. First select the part of the image you would like to scale with a rectangular box (or use “select all”). Then select “Edit/Content Aware Scale” as shown below.
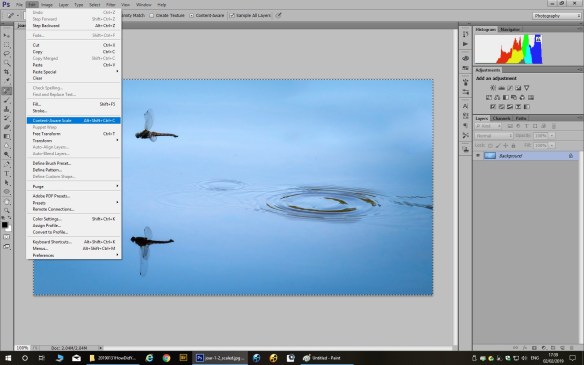
Now move the edges of your image inwards and watch the magic happen. Look carefully and make sure non of the main subjects are compressed by the effect. The vacated parts will be filled with background colour, but you can remove them with a crop.

Correcting Horizontals and Verticals

One member asked how to correct an image where the main subject is tilted at a strange angle. There are alternative two ways of doing this. The first and simplest method is to rotate the image and crop it. This method is best used for an image, such as a seascape, where the horizon is tilted or an image, like the one below, where an object which should be vertical (the church tower) is leaning to one side.
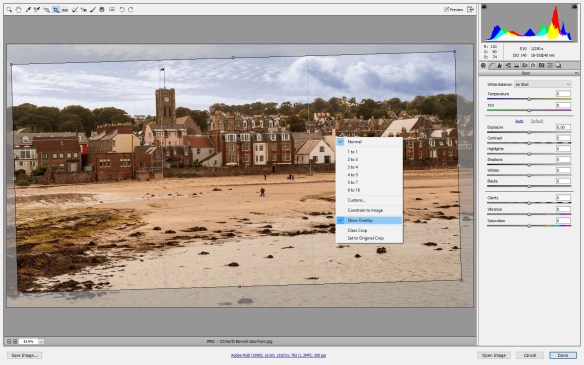
The example shows the crop tool in “camera raw”. Right-click on the image and ensure that “Show overlay” is ticked. Move the mouse outside the crop area and drag the edges to rotate the crop until the overlaid lines match up with the horizontals and verticals in the image.

If your image is more complicated, such as an architectural shot, the second method is to use the lens correction filter, as shown below. The “camera raw” lens correction filter is easier to use. Click on the tool which looks like a lens schematic “()()”. The “rotate” slider rotates the image, just as before. Use this slider to line up the horizontals and verticals in the centre of the image. The “vertical” and “horizontal” sliders can be used to correct the horizontals and verticals at the edge of your image. (The “distortion” slider can be used to straighten lines if your shot is taken with a wide angle lens.)
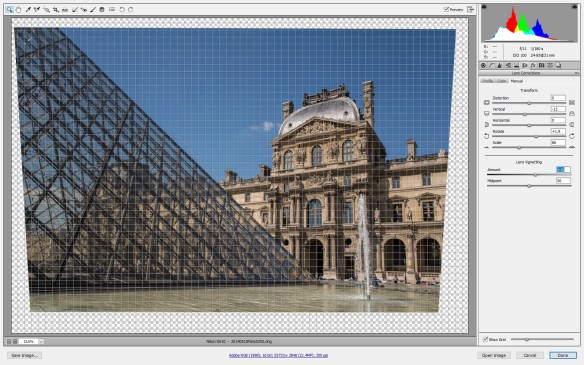
The lens correction filter in Photoshop itself has the same controls, but the “rotate” control is very fiddly to use.

After using the lens correction filter you will need to crop the image. If the sloping edges mean you lose something important outside the crop, it is possible to crop slightly outside the boundary and use a “Content Aware Fill” (available from CS6 onwards) to fill the missing parts. You should treat this fill like a clone and repair any odd-looking artefacts with the healing brush.

Don’t Make The Mistake I Made

Here is an image showing a mistake I made when creating a black and white image. The black and white conversion tool in Photoshop can be used to convert a colour image to black and white. The tool lets you adjust the colour sliders, or apply one of a number of presets, until you get the effect you want. Sometimes you will find different conversions work better in different parts of the scene. In the image below I applied two different black and white conversions to the bottom and the top of the image.
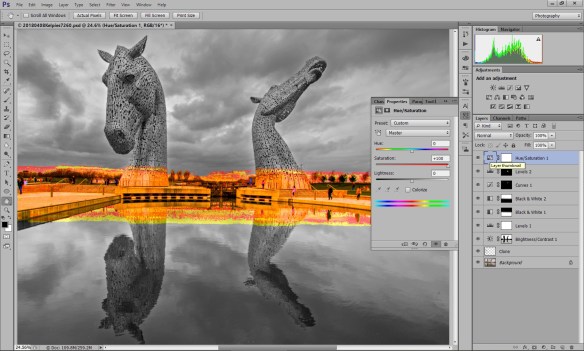
The mistake I made? The opacities of the two conversion layers don’t add up to 100%! Right in the middle there is a patch which looks black and white but actually has a tiny hint of colour. The mistake is revealed by boosting the saturation. To ensure you never make this mistake, always add a black and white conversion or desaturation layer which acts on the whole image.

Solarization Effect

Finally, here is a special effect you can try on an image with boring highlights, such as a blank and uninteresting sky. Applying a curves adjustment in the shape of an upside down “U” will create a solarization effect in which the dark parts of the image are shown in positive and the lighter parts are shown in negative.
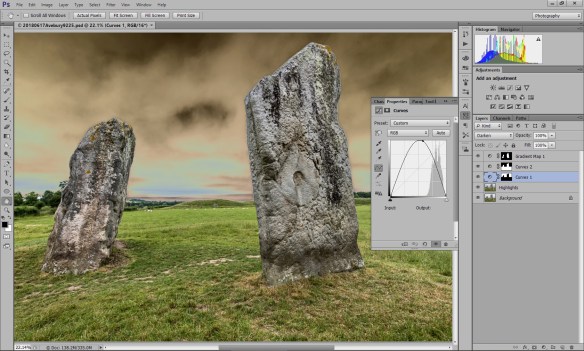
You can vary the effect by dragging the top of the curve left or right, and you can use a layer mask to confine the effect to just part of your image. For example, the mask in the above image prevents the effect changing the white parts of the stones.

I hope these hints and tips will help members to adjust their images or have some fun with the special effects.
 

24 January 2019 (Swedish Interclub)

This week club members had a chance to be judges themselves. We discussed 36 images sent to us by Mölnlycke Fotoklubb in Sweden. There were an impressive collection of images covering a wide range of subjects: portraits, street photography, woodland scenes, misty winter landscapes, some interesting night shots and some creative abstract shots. We were especially interested in the images this year, because some of our members are planning to visit Mölnlycke Fotoklubb and may be able to visit some of the places where those images were taken. The images generated a lot of discussion, with members commenting on each image while scribes write down the comments. At the end of the evening we selected the images we liked and then ordered them by popular voting.

The winning image was a stunning night shot taken at a water hole in a Kenyan wildlife reserve. It was a superb composition with a tree acting as a focal point and the waterside leading your eye to the animals in front of a starry background. The image was very dark on our projector but we still liked it a lot. For second place, members chose a portrait of a lovely group of ponies in Rörö wildlife park. Third place went to a long exposure night shot of a ride in an amusement park entitled “loop”, fourth place to a peaceful shot of a lakeside with an archway of trees and fifth place to a portrait of a potter holding his pipe.

Thank you Mölnlycke Fotoklubb for sending us the images. Congratulations to the winner, and some of us look forward to seeing you in a few months’ time.


Human Portrait Print Submission

I forgot to mention at the Swedish inter-club meeting, that this Thursday, 31st January is the submission date for the Human Portrait print competition. Please bring along up to 3 mounted prints (colour or black and white). If you haven’t entered this competition before, it is open to any print where the main subject is a person or group of people.

This Thursday, George will also be accepting entries for the 2019 SPF print championship. Since we are missing the 26 January drop-off deadline, George has offered to hand them in personally to the competition organisers (before the later 7th February deadline). Members can enter up to 6 mounted prints each: 3 monochrome and 3 colour at a cost of 70p per print. Any print which hasn’t been entered into that competition before is valid, not just prints from this year. If you are bringing portrait prints to enter into the SPF competition, make sure they are added to the correct folder.

Click here to see a PDF describing the competition.


17 January 2019 (Quiz Evening)

This week club members divided themselves into 4 teams and spent an enjoyable evening answering some fiendishly tricky questions posed by Ken Sharp. We started the evening identifying various statues located in the Edinburgh New Town. (Ken explained the history of the statues when he revealed the answers.) We then we moved on to identifying the settings used to take a collection of images of the same scene. The second half of the quiz involved questions on the history of photography and matching images to the famous photographers who took them. Finally, Ken had a reply to the “Which manufacturer makes the best camera?” question posed last year by Jim Tod. Ken’s question was “What is the best camera?” to which the answer is, “Whatever camera you have with you”. Ken explained that being ready to capture an image is the important thing, so having any camera is better than no camera at all.

The competition was won by the “Right back 4” team, with Liz Sowler, Malcolm and Lorraine Roberts and me. Thank you very much to Ken for entertaining us.

10 January 2019 (The Camera Never Lies)

Our club meetings resumed after the Christmas break with a talk by Edinburgh photographer Neil Scott FRPS (who had given us an entertaining talk, “Keep It Simple Stupid” in 2017). We were one of the first camera clubs to hear a brand new talk from Neil:  “The Camera Never Lies”.

Neil explained that he likes to specialise in 3 kinds of photography: Still Life, Street Photography and Surreal or Abstract photography. He showed us in each of those categories how the photographs can lie about a subject. A common technique is translocation, where a subject is extracted from one scene and added to another, unrelated background. Neil is particularly successful at doing this in his street photography, where a snatched shot of someone against a cluttered background becomes a studio-like shot of that same person against a fresh background. In one example, a shot of a gothic street performer in the Royal Mile looked much more dramatic against a graveyard. Neil has the knack of being able to crop right in on his subjects to cut out the clutter. Neil is also extremely imaginative: combining seemingly unconnected subjects together to make an impact. If you want your subject to look like they are in jail, place them against a crumbling wall and use a photograph of a grill pan in the foreground to make the bars!

Neil also showed us how he constructs his still life and abstract images. Some of them start as an idea seen in passing: a coffee mug placed oddly on a saucer or a picture hanging on a wall in the background. Neil will play with an image until it works; sometimes replacing all the original components on the way.

Neil finished his presentation by taking us through a history of fakery in photography, which has been happening long before Photoshop let you do it more easily. From the Cottingley Fairies to the less favoured compatriots of Lenin or Stalin being conveniently air-brushed out of their publicity photographs, the camera has had the ability to lie to us since the day it was invented.


Observing Comet 46P/Wirtanen

As I mentioned at yesterday’s club meeting, there is a comet moving across the sky this weekend. It is called “46P/Wirtanen” and is currently moving North through the constellation of Taurus, which is just to the right of the constellation of Orion. You should be able to see the comet by looking south around 10pm. The comet is supposed to be visible to the naked eye, but you need to look very carefully. It is larger than the size of the full Moon, and if you see it it will look like a faint, fuzzy blob. Any nearby street lights or thin cloud in the sky will spoil the view, so you will need to find somewhere dark. There are some dark spots along the coast at Longniddry Bents, or up Birsley Brae.

If it’s too faint for your eyes, a pair of binoculars will help (the larger the better). Better still, you could try photographing the comet! A long exposure on the digital camera will bring up more detail than you can see with your eyes. On a photograph you’ll notice the comet is green. There is a photograph of the comet displayed at http://www.spaceweather.com/, where they say:

This comet is an easy target for digital cameras with exposures as short as 10 to 30 seconds. Astrophotographer Juan Carlos Casado offers some advice to novices: “Use Raw file format, a fast lens (at least f/2.8) and ISO settings between 1600 and 3200. The exposure will depend on the focal length. I normally use the 500 rule–that is, exposure = 500 / focal length (mm). It also helps in areas with light pollution to use an antipollution filter. I am now using Optolong L-Pro clip filter which gives excellent color balance.

What the photographer doesn’t say is that you will need to set your camera to manual mode. Manually set the focus on infinity, mount the camera on a tripod, turn off vibration reduction (if your lens has it), set the camera to “M” mode and set the aperture and shutter speed manually. You can use a standard lens, rather than a telephoto, because the comet is quite large. Check out the Christmas tree photo at spaceweather.com.

You can find sky charts of the comet at http://www.cometwatch.co.uk/comet-46p-wirtanen/ and there is a live image of the sky showing where the comet is right now at https://theskylive.com/46p-tracker.

Best of luck!

Steven.