01 October 2026 (Discussion on Printing and Mounting)

This week we discussed printing and mounting techniques. Steven showed how he prepares his images for printing, using the same high contrast black and white image he showed during last week’s “High Contrast Workshop“. The steps involved:

  1. Flattening the image into a single layer.
  2. Resizing the image to match the printing size. Steven recommended making the image slightly smaller than the size of the chosen printer paper to allow a margin around the edge.
  3. Sharpening the image (for example by using the “unsharp mask” filter in Photoshop). In general, printed images need to be sharpened more than images displayed on the screen. The amount of sharpening depends on the kind of image: for example more sharpening for high contrast black and white images but less sharpening for flowers or soft baby portraits.
  4. Lightening the image. Images are displayed on a screen by shining a bright light through them, but images printed on paper are viewed by reflected light. That difference tends to make the same image look darker when printed. You can compensate for this difference, and make your prints brighter and punchier, by lightening your image before printing it. When making an adjustment, the secret is to adjust the slider so the image looks a little brighter than ideal on the screen, but not overwhelmingly bright. If you are using your own printer you could print some small test images at different settings.
  5. Finally, create an empty layer and use the “Stroke” tool to add a 2 pixel wide black border around the edge of the image. This gives a print a clean boundary at the edge, which is useful if you are mounting the print directly onto a mountboard but not so useful for window mounts.
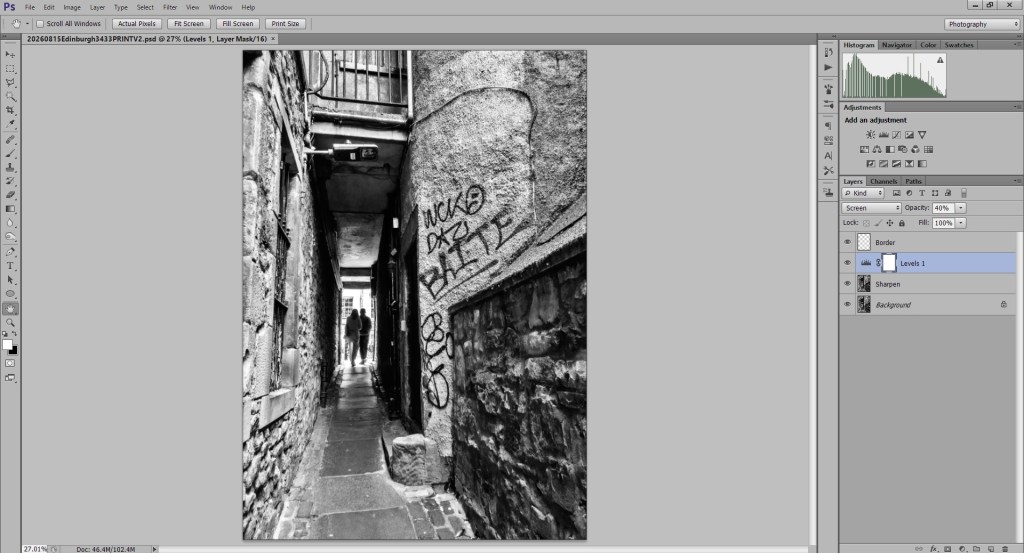
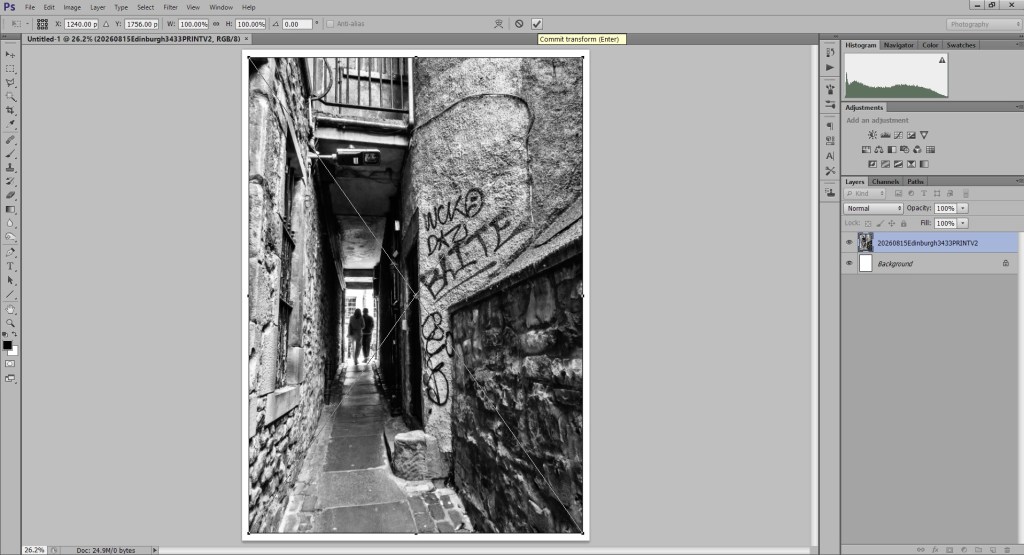
The image above shows an example of the final image. If you are printing at home you would normally select “File/Print” to bring up the print dialogue box. You can check that the print will fit onto the paper by setting the “Scale” to 100% and making sure there are no warnings. But if you would like to save an image to be printed on the club printer you can use the technique suggested by Derek earlier during the “Editing Workshop“:

  1. Create a canvas in Photoshop the exact same size as the printer paper.
  2. Place your image onto that canvas. Steven’s favourite method is to use “File/Place”, which is easier than cutting and pasting.

You can then see what your image would look like when printed onto that paper, and if you save this image it will be an exact representative of the printer paper:
There is some guidance on resizing, printing and mounting on the club web site:

Steven ended the session with a mounting demonstration, showing how this same print could be attached to mountboard and trimmed to the correct size. More details will be posted on the club members’ Facebook page. Mike will be back next week, and we will have an extra session at the Fisherrow Centre specifically for printing and mounting with the club equipment.

Next week, Derek will be back with some special guests for “Interview with a Photographer”…
24 September 2026 (High Contrast Workshop)

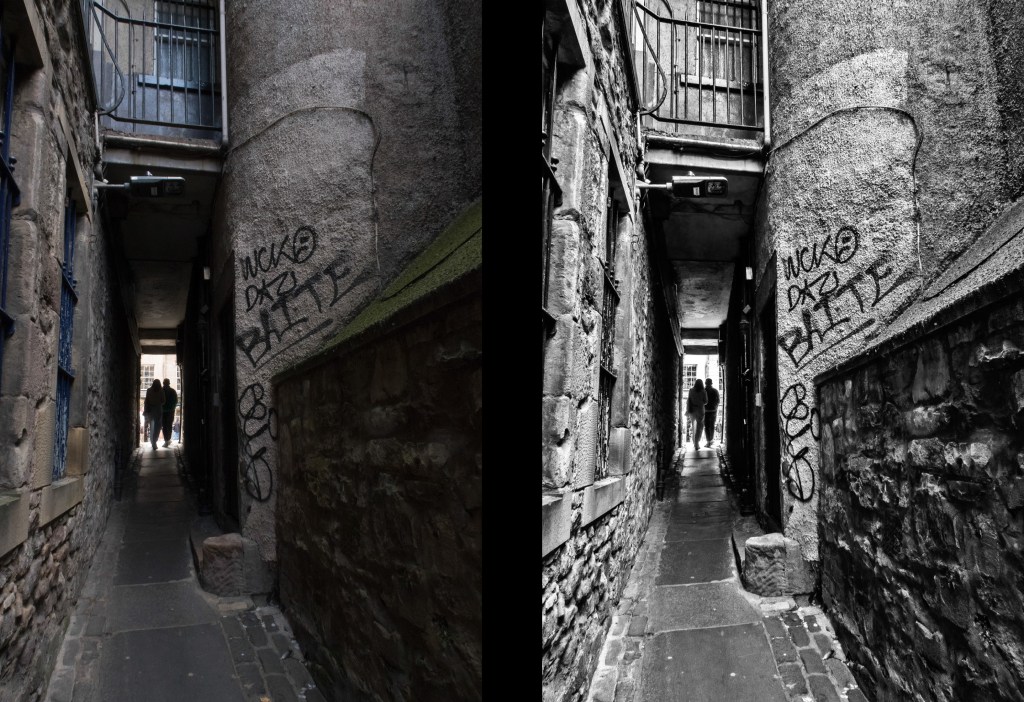
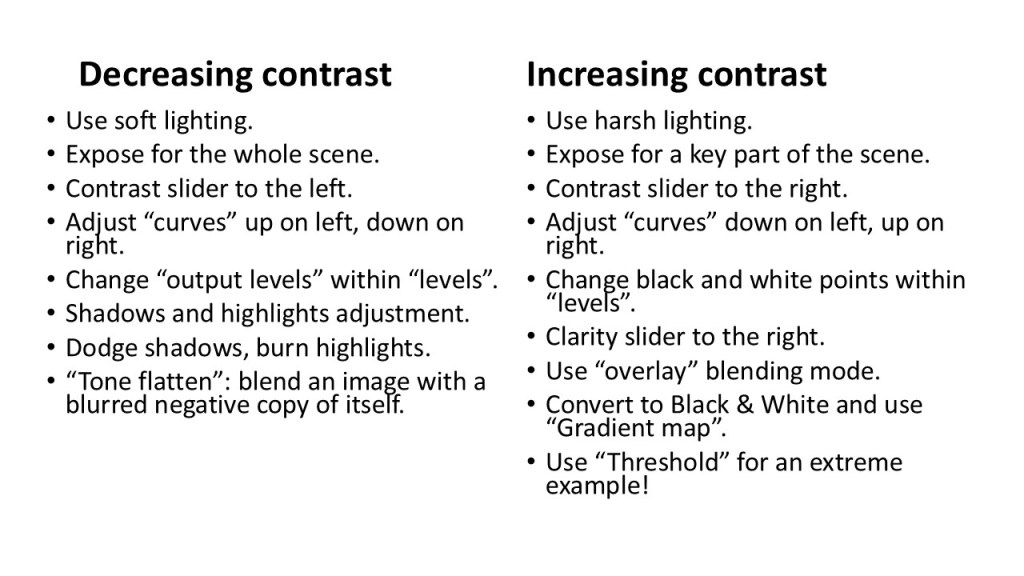
This week we discussed the use of contrast in photography, and the methods a photographer can use to control the contrast in an image. How much contrast you need depends on the kind of photograph you are aiming for. Molly Hollman’s flower photographs, for example, needed a low contrast to reveal their soft beauty. She achieved that by photographing the flowers on a cloudy day, or softening the light with a diffuser. A reduced contrast can also help group photographs or expansive landscapes, where you want to see detail everywhere. But there are some kinds of photography, such as isolated portraits, stark architectural photographs or black and white textures, where a high contrast can improve the impact of the result. Harsh lighting, such as direct sunlight or a single bulb, can help to create these images. Steven showed a slide which summarised the techniques you can use to decrease or increase contrast:

He also showed an example where a combination of these techniques had been used to convert a photograph of a Edinburgh close into a black and white image with a high local contrast, as shown below.

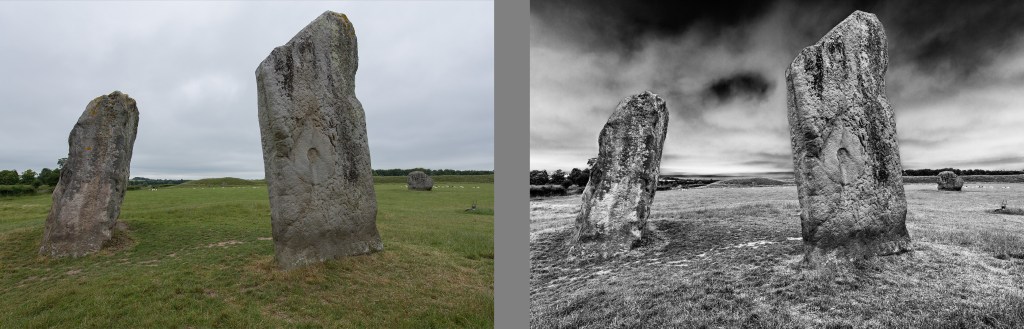
A combination of a “curves” adjustment and a high contrast black and white conversion transformed this image of the Avebury stone circle. More details will be posted on the club members’ Facebook page.

We ended the session by practising some high contrast portrait photography, as inspired by this Instagram video:

At one station we used a white background and a single bulb, and at another station we used a black background and a bright spotlight. A hand-held LED lamp was also found to be useful. We will carry forward what we learned this evening to the “Film Noir” portrait workshop on 22nd October 2026.

17 September 2026 (Molly Hollman: Creative Flower and Plant Photography)

This week we had our first speaker on the season. Award winning photographer, Molly Hollman, joined us by Zoom from East Kent to talk to us about “Creative Flower and Plant Photography”, which is also the title of Molly’s book. Molly explained that she likes all kinds of photography, but photographing gardens and flowers is what she likes best. She works as a teacher Monday to Thursday, but on Fridays you will often find her with a camera in one of the public gardens near where she lives. Molly is a members of the Historic Houses Association (HHA), which gives her access to more local houses with gardens than the National Trust (at least in England it does). When photographing flowers in a public garden, Molly is careful not to disturb anything. She has more freedom when photographing flowers in her own garden, or in her home studio, and can move things around to get the background she wants. You can see some of Molly’s work in the portfolio on her web site: https://mollyhollman.myportfolio.com/flowers

Molly uses Sony cameras, and has a collection of vintage lenses with focal lengths ranging from 24mm to 600mm. She uses the shorter focal lengths for studio work, and macro lens for photographing insects, but when she is out and about exploring gardens she prefers a long focal length lens to a macro lens. A long lens lets her blur the background but maintain a safe distance from the flower. Besides her cameras and lenses, Molly’s most used pieces of equipment are:

  • A diffuser, which can filter sunlight and reduce harsh shadows when taking close-ups.
  • A clamp for holding a flower or branch in the wild or in the studio. She recommends the Wimberley Plamp for garden work or a Third Hand Tool for small studio work.

A full list of equipment can be found on Molly’s web site: https://mollyhollman.myportfolio.com/equipment-and-other-resources

Molly gave us some hints on how to compose a flower or plant photo. Don’t crouch over a flower and photograph it from above. You need to get down (or up) to its level. Think of a flower like a face and compose it like a portrait. If it is “looking” in a certain direction, allow more space in that direction. Upright and symmetrical plants will look good when placed in the centre of the frame. The focus point is crucial. Molly uses manual focus so she can place the focus point exactly where she wants it: sometimes on the anthers in the middle of a flower; on a leaf or seed; or even on the edge of a petal. Molly takes flower and plant photos with a wide aperture and small depth of field, which concentrates attention on the subject and keeps the background blurred. However, a narrow aperture works better when photographing an insect on a flower, so the depth of field can cover most of its body. Molly will try different viewpoints to get the best background. But if nature doesn’t provide a good background, she also has a collection of background images made by taking out of focus shots of all kinds of coloured objects (such as a garden fence, a blue T-shirt, a green hedge, a child’s painting, etc…). These images can be printed to make a backdrop, or can be added using Photoshop. Molly has made so many that she sells them on her web site: https://mollyhollman.myportfolio.com/overlays-and-textures-1

Molly prefers to take outdoor photos on a cloudy day when the sun doesn’t cast harsh shadows (and uses her diffuser at other times). Shots taken during the golden hour (near sunrise or sunset) often work best for garden landscapes, especially when shot into the sun with a neutral density (ND) filter. The low sun can work well as a backlight for flower photography, and you can also get some good silhouettes of ferns or bracken during the blue hour.

Molly went on to describe her indoor studio work. She likes to photograph flowers indoors using natural light from a window or conservatory, but will also use a light box which delivers diffuse light from the side and from the top. Flowers can be held in place using “Third Hand” clamps mentioned earlier. Coloured card (or a printed backdrop) can be placed behind and underneath each flower display. A light pad (of the type used for viewing slides and negatives) can be used as a backlight for a display of translucent flowers. Molly prefers to capture good pictures straight out of the camera, but will use Lightroom and Photoshop to crop the images, lift the shadows, improve the contrast, remove noise and dust spots and (if needed) drop in a new coloured background (often blended with the existing background for a more natural look).

Molly finished by introducing her photography course (https://mollyhollman.myportfolio.com/my-online-course) and inviting us to check out her YouTube channel (https://www.youtube.com/@MollyHollmanPhotography/videos). During questions we learned that Molly sometimes enhances the lighting with a reflector but never uses a flash. We also learned that her favourite lens is the one provided by her Sony RX10iii bridge camera, because it is the lightest and most versatile for travelling with. Thank you Molly for a fascinating and insightful talk.

  • On Thursday, 24th September we will be trying out some “high contrast photography”. Please bring your camera and check out the video on the single light bulb technique which Derek posted: https://www.instagram.com/reel/DdCKXFxjSMv/

10 September 2026 (Editing for Competition – Part 2)

This week we had the second part of the editing workshop. Members brought their laptops and helped each other to edit their images. John Fowler began by explaining that a good image is created by the photographer, not by the camera. You need to capture a good image before editing begins. John compared two images taken at Seacliff beach on the same day.

  • The first image showed an expanse of colourful sandy beach, with the sea and Bass Rock in the distance, a few rocks and waves in the distance, a nice sky, and a few people dotted around the beach. It’s the kind of shot you would take when you first arrive, notice the lovely view, and snap it with your camera. But the camera doesn’t fully capture all the lovely things you noticed with your eyes. The composition is boring.
  • The second image showed what happened when John got closer to the rocks and waves. The rocks now fill the frame, with waves crashing over them. John positioned himself so that Bass Rock could be seen in the distance between the crashing waves, creating a much more dramatic composition. No amount of editing could have converted the first image into the second, although editing could now be used to enhance the detail in the waves and improve the impact of the image even further.

Derek showed us how he resizes images for printing and DPI competitions. There is some guidance on resizing, printing and mounting on the club web site:

Derek showed us a variation where he creates a white canvas in Photoshop the same size as the printer paper, which allows images to be placed anywhere on the paper and gives you control over the exact size of the margin (rather than relying on the printer dialog). This technique is useful when creating images for the club printer.

Derek also showed how images provided by Jim and Janet could be improved by removing distractions, cropping and making fine adjustments by dodging and burning. Thank you, Derek, for a very useful and entertaining evening.

  • After all this talk about resizing for competitions, next week is the submission deadline for our first competition of the year: the Digital Projected Images competition. Please email your 3 JPEG images (sized to fit into 1600×1200 pixels) to our competition secretary, George Todd. You can find George’s email address on your membership programme.
  • There has been a change to the programme: Derek will not be able to make it to the “Film Noir” portrait workshop originally scheduled on 24th September and, since Derek is our portrait wizard, we’ll instead use this evening to practice our high contrast techniques. The “Film Noir” workshop has been rescheduled to 22nd October.
  • Next week, on 17th September, Molly Hollman will be talking to us about “Creative Flower and Plant Photography”. Click on Molly’s name to check out her web site and see some examples of her work. However, since Molly lives 450 miles away in East Kent, she won’t be coming to Musselburgh! She will be chatting with us by Zoom instead. You can still join us in room G3 at the Fisherrow Centre, but I’ll circulate a link to all paid up members so you have the choice of connecting from home. The meeting starts at 7pm as usual. I look forward to seeing how she creates those fabulous flower images.

If you signed up to this blog and have changed your mind, you can click the “unsubscribe” link at the bottom of this email to stop these messages.

20 November 2025 (Soft Focus and Double Exposure Workshop)

We spent the club meeting on 20th November learning some techniques that we could try on our Saturday photoshoot at the Royal Botanical Gardens in Edinburgh. We tried two different techniques:

1) Double Exposures

This technique combines two or more exposures together to create a surprising result. Try “double exposure photography examples” as a Google search to see some example images. Common examples include portraits blended with natural or architectural silhouettes, or multiple poses blended together. Exposures can be combined in-camera, or they can be captured separately and blended later using software such as Adobe Photoshop. The following YouTube videos show how to set up a Canon camera:

Ask David Bergman: A Step-by-Step Guide for In-Camera Multiple Exposures

Eric Floberg: How to Shoot a DOUBLE EXPOSURE In-Camera [2023]

If you explore the “shooting menu”, you’ll find Nikon cameras have a similar setup. We discovered that all our cameras had slightly different ways of setting up double exposures, and the newer cameras had more options. If your camera doesn’t have a multiple exposure option, you can still take single exposures and blend them in Photoshop. We tried a few experiments inspired by Leonardo de Vinci’s Vitruvian Man.

2) Soft Focus Techniques

Hans van der Boom had given the club a talk on improving flower photograph using soft focus techniques back in April 2024. Bob Daalder also describes how he uses soft focus techniques in macro photography in the following blog:

Macro Photography: Discover the Little World with Bob Daalder

We explored the following soft focus techniques:

  • Using a wide aperture to blur the background.
  • Making a double exposure (as described above) but combining an in-focus image of a flower with an out of focus image.
  • Using coloured cellophane to mask off an area you want to be out of focus.
  • Using an out of focus image of a crinkled piece of Aluminium foil to create some foreground bokeh.

We discovered that both techniques need a lot of practice to get right, but it is fun to experiment. We came away from our Botanics photoshoot with lots of weird and wonderful images.

02 October 2025 (Editing Challenge)

This week members revealed what they had done with the four images that were circulated 3 weeks ago. The four images were:

  • A gyrocopter superimposed on a dark, cloudy sky with an artefact in the background.
  • A Chinese performer in a bright blue costume against a tilted background with distractions.
  • A back-lit lady standing in front of a church.
  • A man in Viking costume with a shield holding a ferret against a building with brightly coloured distractions.

15 members had accepted the challenge. The brief had been to edit any two of the four images, but some members had tried all four. All the images were too dark, so a common correction was the brighten the images and adjust the contrast. The back-lighting had lost some of the detail in the lady’s hair, which could be recovered with a highlights correction. Dodging and burning tools could be used to lighten the eyes and faces of the people or to darken bright blobs in the background.

Members revealed the different ways they had dealt with the distractions in the background. The easiest option was the crop the image to remove the distractions altogether, even if this meant losing most of the Viking man’s shield, for example. Some had used the clone and healing tools to replace distractions, and others had kept them in but made them less distracting by desaturating and darkening the background. There were mixed feelings about the hairs on the Viking man’s costume, which some members had removed as a distraction and others had emphasised as part of his character. The work on the Chinese man showed how you could spent ages removing two really obvious distractions but miss a smaller one that could be eventually pointed out by a judge. It’s worth taking a second look at your images after you have corrected them. However, the most creative way to remove distractions from a background is to replace it altogether. Kevin and Stephen had both replaced the boring grey sky behind the gyrocopter with a much more interesting sky, and Stephen and Jim had placed the Viking man in front of a much more attractive landscape.

Some members had combined the images in creative ways. Elaine combined the Chinese man and the lady into a single portrait, and Steven added the gyrocopter as a hair fascinator for the lady. Marian had converted the images into bold works of art, with a Pointillist rendering of the gyrocopter and a recreation of the Viking man in flowing brush strokes. But the comedy images were the highlight of the evening. Derek had converted the lady into a clown, Joe had given her a scary mask and Kevin had placed her inside a blossoming tree. Elaine had added the gyrocopter to the selfie taken at the Ayr air show. But the most entertaining images on the night came from Jim Innes, who not only managed to add the Viking man to some dramatic landscapes, had also shown him posing in front of an Iceland supermarket. The evening ended with Jim’s image of the gyrocopter being sprayed by fly killer! Thanks a lot to everyone who responded to the challenge.

  • Next Thursday, 9th October, we will be inviting Campbell Skinner to judge our Digital Projected Images competition.

11 Sep 2025 (Creative Lighting Workshop)

We got our 2025/2026 season well and truly started with a creative lighting workshop. Steven began the evening with a discussion of the lighting equipment available to photographers. This web site has a good introduction to creative lighting techniques: https://shotkit.com/photography-lighting/. Taking photos in low light usually requires a long exposure, which can blur your photos with camera shake. Adding extra lighting is a good way to improve portraits and still life photos taken in a dark place. This time we concentrated on portraits. We’ll spend more time on still life photography at our second workshop on 13th November 2025. There are two basic kinds of lighting available:

  1. Flash. A flash creates an intense and very rapid burst of light. The burst is so rapid that it freezes any movement or camera shake. A disadvantage of a flash is that it can cast a shadow onto the background. Also, because the flash only fires briefly, it’s hard to see in advance where those shadows will be. Some flash units have a dim “modelling light” which shows up the shadows. Firing a flash straight into someone’s face can also cause “red eye”. If your camera has a built-in flash it will probably suffer from these problems. You can get a softer lighting and eliminate the “red eye” problem by attaching a flashgun to your camera and angling the flash upwards so it bounces it off a light ceiling. You can start to emulate a studio setup by adding “slave” flash units which synchronise with your main flash. Lighting your subject from the left and right side can give a softer effect with fewer shadows.
  2. Continuous lighting. Continuous lighting allows you to see how your subject is illuminated before you take the picture. You can add as many lights as you like. However, these lights tend to be dimmer than flash, so you’ll find yourself putting up with longer exposure times. We demonstrated several different kinds of continuous lights at our workshop. There were some bright, mains-powered bulbs, a battery-powered LED panel and a battery powered torch.

Members tried out 3 main lighting setups. Ed and I had set up some of the club’s studio lighting equipment. This equipment consisted of two main-powered flash units combined with some modelling lights, a diffuser umbrella and a “beauty dish”. The equipment triggered each time it detected a flash. This combination was good at taking well-lit portraits with soft lighting. Derek had brought two contrasting setups with continuous lighting. One setup demonstrated how a single light from the side can create dramatic, high contrast portraits. The other setup had two lights with red and blue gels, which created colourful special effects. Steven showed how the battery powered lights can be deployed and removed very quickly, when the LED panel and the torch were used to photograph a rabbit who didn’t like the bright lights.

Next week (18th September) we have our first speaker of the season. Graeme Barclay of Midlothian Camera Club will talk to us about Street Photography.

20 February 2025 (Joe Gilhooley: If I Can Do It, You Can Do It)

The club was delighted to welcome Joe Gilhooley from Loanhead, Midlothian to talk about his work. Joe’s interest in digital photography began in 2010, when he wanted to record his daughter growing up. He purchased a Canon DSLR and took the camera on family trips. He developed a liking for landscape photography but fell into the usual trap of coming home with 400 scattergun images of the same scene. He now recommends pretending you have a roll of film and only capturing the small number of images you think are worth keeping. Joe has 3 Canon DSLR camera bodies, a Sony compact camera, and a selection of 9 lenses. He always uses a tripod for landscape photography and recommends using the camera in “mirror up” mode with a remote shutter release to prevent camera shake. Joe’s love of landscape photography won him the “Scots Magazine Photographer of the Year” award in 2017 and 2019. Joe joined the Royal Photographic Society in 2020 and achieved an LRPS qualification in 2021 and is working towards the ARPS qualification. You can see more of Joe’s work on his web site:

http://www.joegilhooley.co.uk/

Joe started by showing us the 10 images he had submitted to win his LRPS qualification, which included a night view of the Forth Bridges, a night view of Edinburgh from Calton Hill, star trails over the Belhaven Bridge and a clever still life which simulated colours being painted onto a bowl of fruit. Joe likes to take his landscape images during the blue hour: the hour just before sunrise or just after sunset when sky is still bright enough to give a blue background. Joe watches the weather forecast and will often drive to a location at short notice to arrive in time for the perfect conditions. Calm conditions at sunrise are ideal for capturing still reflections and morning mist. Joe took us on a journey across Scotland, showing us a wide variety of excellent images of castles, gardens, monuments, lochs, mountains and iconic viewpoints. His subjects included landscapes, cityscapes, wildlife, star trails and fireworks. In 2022, Joe successfully applied for a press contract to photograph the Edinburgh Military Tattoo, which gave him the opportunity to capture some beautiful images of the event. Joe had also offered his services to several football clubs, and had obtained a press pass to capture images of key moments during their games. Joe finished by showing us some of his sports photography images. Joe uses two camera bodies for his sports photography. One body has a 400mm lens attached, which he uses to capture distant action. The other has a 70-200mm lens, which he uses when the action gets closer. He uses fast (f2.8) lenses and a very high ISO to achieve the fast shutter speeds required for sports photography. A monopod helps to support the weight of his heavy 400mm lens.

It was a fascinating evening where Joe gave us hints about good places and times to take photographs and encouraged us not to be afraid to contact organisations like sports clubs and local newspapers who may need a local photographer.

  • We are having our “Sense of Speed” club photoshoot this Saturday, 22nd February at 10:30am in Lewisvale Park, Musselburgh, EH21 7AR. Bring your camera to practice photographing bicycles, dogs and people moving against a background. For best results bring a lens with a large maximum aperture, such as f2.8.

12 September 2024 (Bring in your Kit)

This week members brought in their cameras, plus other pieces of interesting and thought-provoking kit. Most members were divided into Nikon and Canon camps, but I also noticed some Sony and Panasonic cameras. George Todd pointed out that the club has a Sony DLSR camera which members are welcome to borrow if they don’t have a DSLR camera of their own. The evening was an opportunity for members to discuss kit and help newcomers and beginners with any questions they might have. There is an opportunity for beginners to pair up with more experienced members who have the same kit.

Some members showed some unusual or particularly useful equipment that you might not know about.

  • Steven showed the oldest camera he owned, a Russian Zenit TTL film camera, only to discover this model is apparently the “new fangled” version which has a light meter built into it. The beauty of this camera is that the shutter works by clockwork, so the camera can be operated without a battery. You could lock the shutter open for hours without worrying about the battery running out.
  • Steven also showed his “Wimberley Plamp“: A useful device which can be attached to a tripod to prevent a specimen from moving in the wind.
  • Steven also showed his smallest and most unusual Nikon lens, a pinhole! Pinhole lenses are made by making a small hole in a sheet of thin metal attached to a plate which fits to the camera. You can buy one for your camera or you can make one yourself by drilling a hole in a blanking plate, covering the hole with aluminium foil and making a pinhole in it. Pinhole lenses give your photos a blurry but arty appearance with a huge depth of field.
  • By contrast, Mike showed us his largest Nikon lens and, in particular, the gimbal tripod head which he used during the air show. A gimbal head takes the weight of a large lens and, when balanced correctly, can hold it steady and make it easier to follow moving objects. It is very helpful for wildlife, aviation and sport photography where your subject is moving.
  • Mike also showed us the sling strap he uses to carry his large lens, which takes the weight of the lens but give some freedom of movement.
  • John showed us the clever thumb rest which attaches to the hot shoe on the top of his compact camera and prevents his thumb from accidentally touching any controls while shooting. Here is one example: https://www.bhphotovideo.com/c/product/1032640-REG/fotodiox_thumb_grip_b_pro_thumb_grip_for.html
  • There was a discussion about using the rear screen of a camera as a viewfinder. It is easy enough to see the screen in a darkened room, but the screen can be difficult to see in bright daylight. You can buy sun hoods which fit over the screen and make it easier to see. Some of these hoods also include magnifiers which make the display easier to read. Here are some examples: https://www.bhphotovideo.com/c/buy/LCD-Hoods-Shades/ci/4968/N/3777857691

George showed us the 6 images that will be given to members for the editing challenge on 3rd October. Please contact George if you would like a copy of the images. Select 2 of the images and show us how you have changed them.

George is also accepting entries to our Digital Projected Images competition. Please email your 3 JPEG images to George at georgetodd1957@me.com. Images should be scaled to a maximum size of 1600 pixels wide and 1200 pixels tall. George can help if you don’t know how to do this. We had a discussion about the DPI (dots per inch) setting associated with an image, but you don’t need to worry about this as it is only important when printing.

There was going to be a “Strike a Pose” photoshoot this weekend, but this is being postponed because the organiser is ill. Get well soon. We’ll let you know when it is rescheduled.

Next week we have our first speaker of the year. Fiona Brims will tell us about her journey into creative portraiture. You can check out Fiona’s web site here:

https://www.fionabrimsphotography.co.uk/

Perhaps she will give us some inspiration for the rescheduled “Strike a Pose” session? See you there.

11 April 2024 (International ZOOM Speakers)

On 11th April we were delighted to have 3 international speakers who joined us from Sweden and the Netherlands.

First up was Denise van der Boom who provided a bird’s eye view using drones to capture images from the sky. Denise has a very practical reason for favouring drone photography due to mobility issues. The drones do provide a great tool for getting compositions and locations that just would not work on foot. Members might recall Eddie Telford telling us back in February than he often waded into a river to get best shots. Denise gets similar shots without getting wet by hovering her drone over the water. The legalities of drone flight were mentioned (similar to UK rules) along with a brief comparison of a few different models. The small size and low weight of the DJI mini 4 meant that it could be taken on holidays as well as providing that unusual bird’s eye view of her homeland. While the novelty of the different views afforded by drones is interesting, there is still the need for a good composition. Abstract images of tulip fields full of coloured strips of flowers to the astonishing aqueduct that confused the senses, rainbows in agricultural watering systems and fine historic buildings all benefitted from the unusual viewpoint. Denise’s work can be seen at https://www.flickr.com/photos/denisevanderboom/

Hans van der Boom followed with a great 10 tips for “Photographing flowers in soft focus” using his own shots to illustrate his points (some of which may be found at https://www.flickr.com/photos/hansvanderboom/).

  • Use a Macro lens or adapters
  • Accessorise – mat to lie on, lights, plamps, clothes pegs, crinkled tin foil and, surprisingly, dog poo bags – the packs with various colours!
  • Use a BIG aperture, you don’t want all of the detail of a pin sharp image.
  • Make use of “out of focus” areas, to simplify your image.
  • Know your subject – go out with certain “in season” flowers in mind. An online Flowering Calendar could give an idea about what flowers might be currently available.
  • Pay attention to composition and space within the image. Using a low viewpoint (using a bean bag, or even a polystyrene bean bag for weight reduction) can keep the image simpler. The space around the subject is out of focus and this minimises clutter. Less is more!
  • Use of Light, avoiding harsh light and dark shadows. The use of a white umbrella can be used to diffuse light
  • Experiment – Christmas lights (battery operated LEDs) in front of or behind the subject. Use crinkled aluminium foil or glitter boards. Use a plant mister for a few dew drops. Place anything in the out of focus areas to simplify them. Reflectors can also be useful.
  • Bokeh and light bubbles are easier to achieve when shooting low to high.
  • Post Processing – add a little brightness and saturation, combine techniques. Moderation makes the master.

Hans also suggested shooting in raw and keeping ISO low to minimise digital noise. He also suggested that double or multiple exposure could be useful. Attaching the coloured dog poo bags, or sandwich bags etc to the lens hood with a clothes peg is a good way to fill the out of focus areas. Hans suggested that folks should look at the work of Bob Daalder for some inspiration.
https://www.instagram.com/bobdaalder/
https://4tinyhands.com/macro-photography-with-bob-daalder/

The evening was brought to a close by Helen Lunden, who many know from her time in Scotland and who is now a member of Mölnlycke Fotoklubb, Gothenburg, Sweden. Helen presented her work on images produced using Intentional Camera Movement (ICM). This was sparked by her attendance at a course in Dumfries and Galloway run by Morag Paterson and Ted Leeming. Helen covered the Why and How of ICM along with what equipment was needed along with examples and inspiration. The equipment used does not have to be special, in fact because the finished result is rarely pin sharp, older or less sophisticated kit can work out fine. Helen often uses an older Olympus EM10 and a mixture of lenses and ND filters.

How? Move the camera during the (long) exposure. An exposure of 1/8th of a second is often enough, and Neutral Density filters can help here. The camera is moved horizontally, vertically, spun, etc. You won’t know what you will get until the photo is taken. Multiple exposure can add to the finished result with perhaps multiple ICM images or 1 ICM image and a sharp image combined. Helen prefers to achieve the result in-camera with only subtle increase in contrast and saturation carried out afterwards. Her method is to “take lots of shots and delete what you don’t like”. While vertical movements are often used for trees and horizontal for landscapes, you can always add in other movements or shapes. An advantage of the technique is that it can work indoors or out, in pretty much any lighting conditions and even macro can be effective. People photos can provide a ghostly effect.

Helen’s recent projects include The Swedish West Coast (ghostly images), Dark & Light (quite moody) and Light & Harmony (quite fresh). It is very interesting to see things in the final images that have been introduced by the working method, the results can be striking. Helen was keen to encourage more photographers to have a go at ICM to see what they could produce. Helen Lunden’s images are on show at…
https://helunhelun7.wixsite.com/helensfoto
and she talked about the work of several other photographers who champion ICM images including…

along with the ICM PhotoMag Network run by

The ICM PhotoMag can be found on Facebook: https://www.facebook.com/ICMPhotoMag/

An interesting international evening highlighting aspects of photography that are not often discussed at Fisherrow.

  • This Thursday (18th April 2024) we will be having a “Studio Lighting Fun Workshop” at the Fisherrow Centre at our usual time of 7pm. Bring your camera or phone and come along to experiment and have fun.