Unknown's avatar

About stevenmbeard

I am the chair of Musselburgh Camera Club, and also a software engineer at the UK Astronomy Technology Centre in Edinburgh.

01 October 2026 (Discussion on Printing and Mounting)

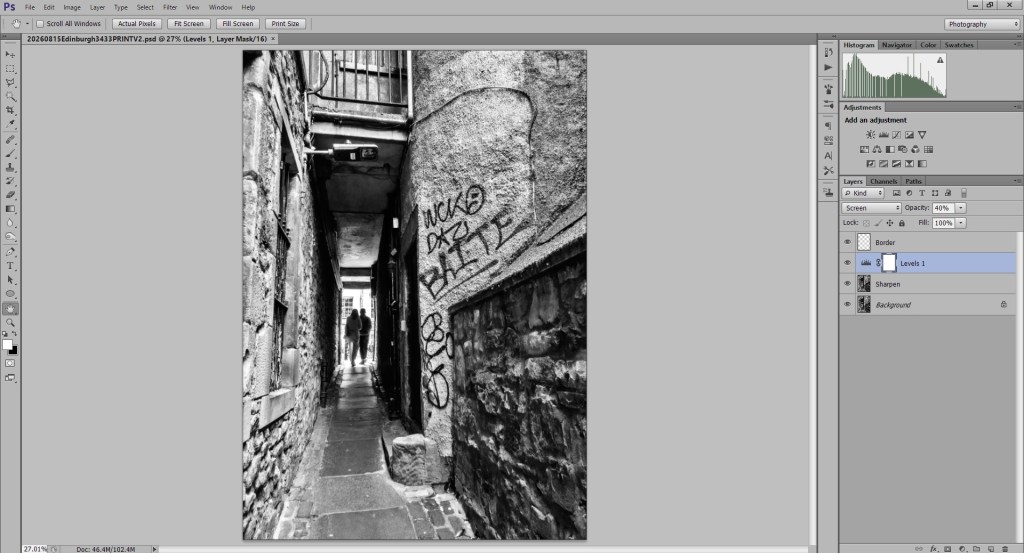
This week we discussed printing and mounting techniques. Steven showed how he prepares his images for printing, using the same high contrast black and white image he showed during last week’s “High Contrast Workshop“. The steps involved:

  1. Flattening the image into a single layer.
  2. Resizing the image to match the printing size. Steven recommended making the image slightly smaller than the size of the chosen printer paper to allow a margin around the edge.
  3. Sharpening the image (for example by using the “unsharp mask” filter in Photoshop). In general, printed images need to be sharpened more than images displayed on the screen. The amount of sharpening depends on the kind of image: for example more sharpening for high contrast black and white images but less sharpening for flowers or soft baby portraits.
  4. Lightening the image. Images are displayed on a screen by shining a bright light through them, but images printed on paper are viewed by reflected light. That difference tends to make the same image look darker when printed. You can compensate for this difference, and make your prints brighter and punchier, by lightening your image before printing it. When making an adjustment, the secret is to adjust the slider so the image looks a little brighter than ideal on the screen, but not overwhelmingly bright. If you are using your own printer you could print some small test images at different settings.
  5. Finally, create an empty layer and use the “Stroke” tool to add a 2 pixel wide black border around the edge of the image. This gives a print a clean boundary at the edge, which is useful if you are mounting the print directly onto a mountboard but not so useful for window mounts.

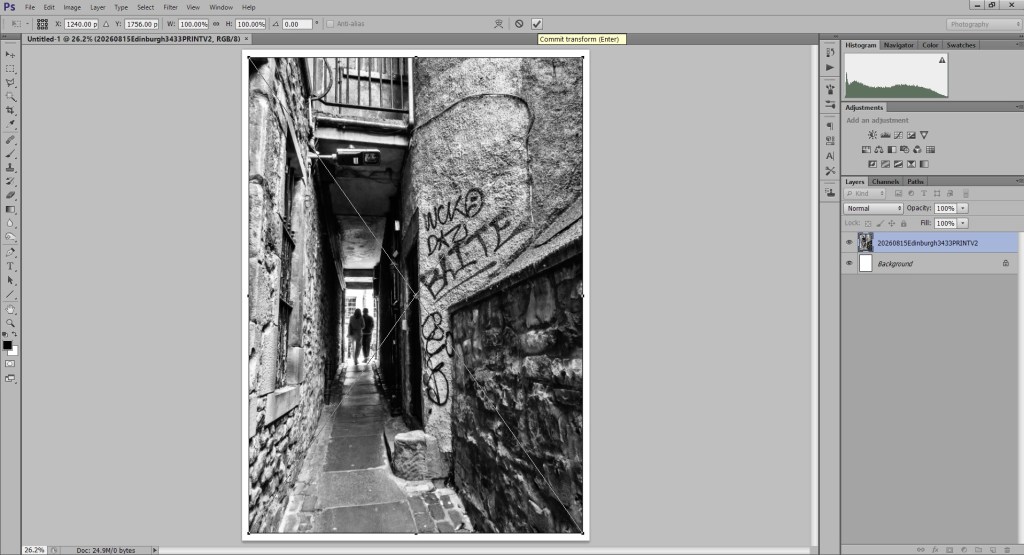
The image above shows an example of the final image. If you are printing at home you would normally select “File/Print” to bring up the print dialogue box. You can check that the print will fit onto the paper by setting the “Scale” to 100% and making sure there are no warnings. But if you would like to save an image to be printed on the club printer you can use the technique suggested by Derek earlier during the “Editing Workshop“:

  1. Create a canvas in Photoshop the exact same size as the printer paper.
  2. Place your image onto that canvas. Steven’s favourite method is to use “File/Place”, which is easier than cutting and pasting.

You can then see what your image would look like when printed onto that paper, and if you save this image it will be an exact representative of the printer paper:

There is some guidance on resizing, printing and mounting on the club web site:

Steven ended the session with a mounting demonstration, showing how this same print could be attached to mountboard and trimmed to the correct size. More details will be posted on the club members’ Facebook page. Mike will be back next week, and we will have an extra session at the Fisherrow Centre specifically for printing and mounting with the club equipment.

Next week, Derek will be back with some special guests for “Interview with a Photographer”…

24 September 2026 (High Contrast Workshop)

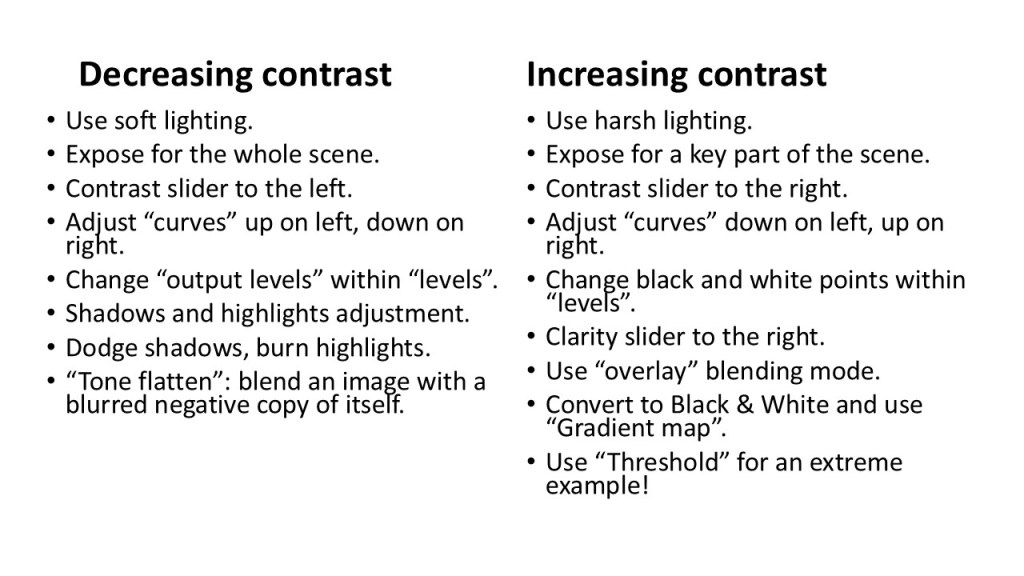
This week we discussed the use of contrast in photography, and the methods a photographer can use to control the contrast in an image. How much contrast you need depends on the kind of photograph you are aiming for. Molly Hollman’s flower photographs, for example, needed a low contrast to reveal their soft beauty. She achieved that by photographing the flowers on a cloudy day, or softening the light with a diffuser. A reduced contrast can also help group photographs or expansive landscapes, where you want to see detail everywhere. But there are some kinds of photography, such as isolated portraits, stark architectural photographs or black and white textures, where a high contrast can improve the impact of the result. Harsh lighting, such as direct sunlight or a single bulb, can help to create these images. Steven showed a slide which summarised the techniques you can use to decrease or increase contrast:

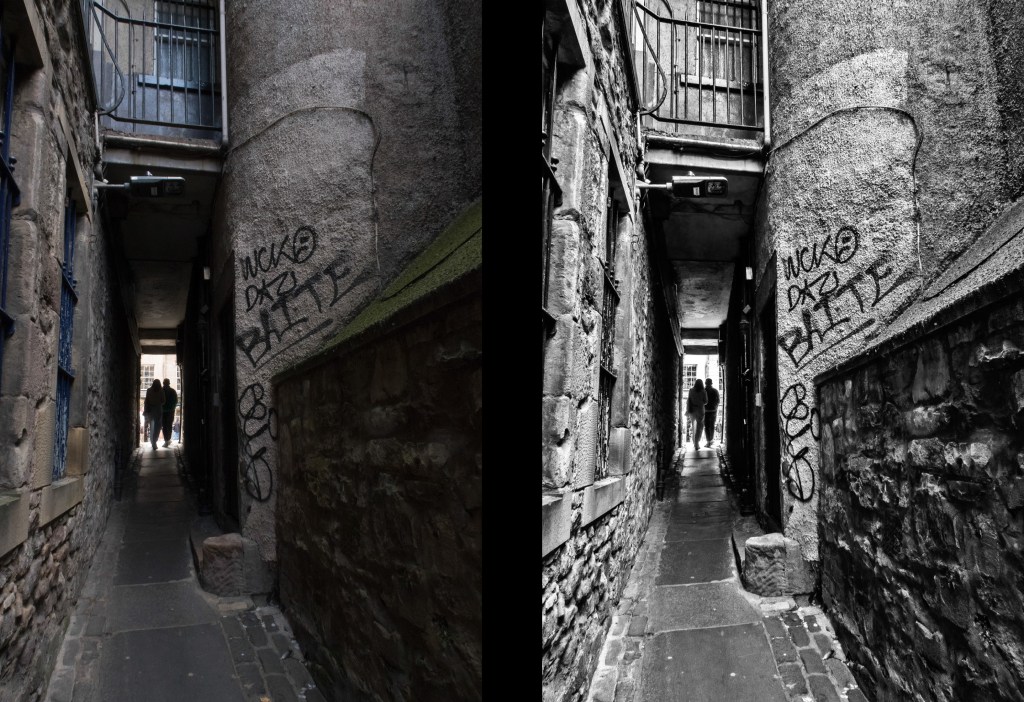
He also showed an example where a combination of these techniques had been used to convert a photograph of a Edinburgh close into a black and white image with a high local contrast, as shown below.

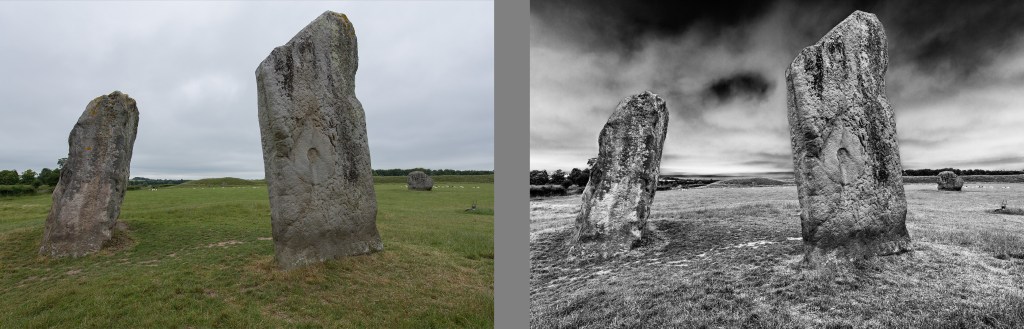
A combination of a “curves” adjustment and a high contrast black and white conversion transformed this image of the Avebury stone circle. More details will be posted on the club members’ Facebook page.

We ended the session by practising some high contrast portrait photography, as inspired by this Instagram video:

At one station we used a white background and a single bulb, and at another station we used a black background and a bright spotlight. A hand-held LED lamp was also found to be useful. We will carry forward what we learned this evening to the “Film Noir” portrait workshop on 22nd October 2026.

17 September 2026 (Molly Hollman: Creative Flower and Plant Photography)

This week we had our first speaker on the season. Award winning photographer, Molly Hollman, joined us by Zoom from East Kent to talk to us about “Creative Flower and Plant Photography”, which is also the title of Molly’s book. Molly explained that she likes all kinds of photography, but photographing gardens and flowers is what she likes best. She works as a teacher Monday to Thursday, but on Fridays you will often find her with a camera in one of the public gardens near where she lives. Molly is a members of the Historic Houses Association (HHA), which gives her access to more local houses with gardens than the National Trust (at least in England it does). When photographing flowers in a public garden, Molly is careful not to disturb anything. She has more freedom when photographing flowers in her own garden, or in her home studio, and can move things around to get the background she wants. You can see some of Molly’s work in the portfolio on her web site: https://mollyhollman.myportfolio.com/flowers

Molly uses Sony cameras, and has a collection of vintage lenses with focal lengths ranging from 24mm to 600mm. She uses the shorter focal lengths for studio work, and macro lens for photographing insects, but when she is out and about exploring gardens she prefers a long focal length lens to a macro lens. A long lens lets her blur the background but maintain a safe distance from the flower. Besides her cameras and lenses, Molly’s most used pieces of equipment are:

  • A diffuser, which can filter sunlight and reduce harsh shadows when taking close-ups.
  • A clamp for holding a flower or branch in the wild or in the studio. She recommends the Wimberley Plamp for garden work or a Third Hand Tool for small studio work.

A full list of equipment can be found on Molly’s web site: https://mollyhollman.myportfolio.com/equipment-and-other-resources

Molly gave us some hints on how to compose a flower or plant photo. Don’t crouch over a flower and photograph it from above. You need to get down (or up) to its level. Think of a flower like a face and compose it like a portrait. If it is “looking” in a certain direction, allow more space in that direction. Upright and symmetrical plants will look good when placed in the centre of the frame. The focus point is crucial. Molly uses manual focus so she can place the focus point exactly where she wants it: sometimes on the anthers in the middle of a flower; on a leaf or seed; or even on the edge of a petal. Molly takes flower and plant photos with a wide aperture and small depth of field, which concentrates attention on the subject and keeps the background blurred. However, a narrow aperture works better when photographing an insect on a flower, so the depth of field can cover most of its body. Molly will try different viewpoints to get the best background. But if nature doesn’t provide a good background, she also has a collection of background images made by taking out of focus shots of all kinds of coloured objects (such as a garden fence, a blue T-shirt, a green hedge, a child’s painting, etc…). These images can be printed to make a backdrop, or can be added using Photoshop. Molly has made so many that she sells them on her web site: https://mollyhollman.myportfolio.com/overlays-and-textures-1

Molly prefers to take outdoor photos on a cloudy day when the sun doesn’t cast harsh shadows (and uses her diffuser at other times). Shots taken during the golden hour (near sunrise or sunset) often work best for garden landscapes, especially when shot into the sun with a neutral density (ND) filter. The low sun can work well as a backlight for flower photography, and you can also get some good silhouettes of ferns or bracken during the blue hour.

Molly went on to describe her indoor studio work. She likes to photograph flowers indoors using natural light from a window or conservatory, but will also use a light box which delivers diffuse light from the side and from the top. Flowers can be held in place using “Third Hand” clamps mentioned earlier. Coloured card (or a printed backdrop) can be placed behind and underneath each flower display. A light pad (of the type used for viewing slides and negatives) can be used as a backlight for a display of translucent flowers. Molly prefers to capture good pictures straight out of the camera, but will use Lightroom and Photoshop to crop the images, lift the shadows, improve the contrast, remove noise and dust spots and (if needed) drop in a new coloured background (often blended with the existing background for a more natural look).

Molly finished by introducing her photography course (https://mollyhollman.myportfolio.com/my-online-course) and inviting us to check out her YouTube channel (https://www.youtube.com/@MollyHollmanPhotography/videos). During questions we learned that Molly sometimes enhances the lighting with a reflector but never uses a flash. We also learned that her favourite lens is the one provided by her Sony RX10iii bridge camera, because it is the lightest and most versatile for travelling with. Thank you Molly for a fascinating and insightful talk.

  • On Thursday, 24th September we will be trying out some “high contrast photography”. Please bring your camera and check out the video on the single light bulb technique which Derek posted: https://www.instagram.com/reel/DdCKXFxjSMv/

10 September 2026 (Editing for Competition – Part 2)

This week we had the second part of the editing workshop. Members brought their laptops and helped each other to edit their images. John Fowler began by explaining that a good image is created by the photographer, not by the camera. You need to capture a good image before editing begins. John compared two images taken at Seacliff beach on the same day.

  • The first image showed an expanse of colourful sandy beach, with the sea and Bass Rock in the distance, a few rocks and waves in the distance, a nice sky, and a few people dotted around the beach. It’s the kind of shot you would take when you first arrive, notice the lovely view, and snap it with your camera. But the camera doesn’t fully capture all the lovely things you noticed with your eyes. The composition is boring.
  • The second image showed what happened when John got closer to the rocks and waves. The rocks now fill the frame, with waves crashing over them. John positioned himself so that Bass Rock could be seen in the distance between the crashing waves, creating a much more dramatic composition. No amount of editing could have converted the first image into the second, although editing could now be used to enhance the detail in the waves and improve the impact of the image even further.

Derek showed us how he resizes images for printing and DPI competitions. There is some guidance on resizing, printing and mounting on the club web site:

Derek showed us a variation where he creates a white canvas in Photoshop the same size as the printer paper, which allows images to be placed anywhere on the paper and gives you control over the exact size of the margin (rather than relying on the printer dialog). This technique is useful when creating images for the club printer.

Derek also showed how images provided by Jim and Janet could be improved by removing distractions, cropping and making fine adjustments by dodging and burning. Thank you, Derek, for a very useful and entertaining evening.

  • After all this talk about resizing for competitions, next week is the submission deadline for our first competition of the year: the Digital Projected Images competition. Please email your 3 JPEG images (sized to fit into 1600×1200 pixels) to our competition secretary, George Todd. You can find George’s email address on your membership programme.
  • There has been a change to the programme: Derek will not be able to make it to the “Film Noir” portrait workshop originally scheduled on 24th September and, since Derek is our portrait wizard, we’ll instead use this evening to practice our high contrast techniques. The “Film Noir” workshop has been rescheduled to 22nd October.
  • Next week, on 17th September, Molly Hollman will be talking to us about “Creative Flower and Plant Photography”. Click on Molly’s name to check out her web site and see some examples of her work. However, since Molly lives 450 miles away in East Kent, she won’t be coming to Musselburgh! She will be chatting with us by Zoom instead. You can still join us in room G3 at the Fisherrow Centre, but I’ll circulate a link to all paid up members so you have the choice of connecting from home. The meeting starts at 7pm as usual. I look forward to seeing how she creates those fabulous flower images.

If you signed up to this blog and have changed your mind, you can click the “unsubscribe” link at the bottom of this email to stop these messages.

Welcome to the 2026-2027 season of Musselburgh Camera Club

I would like to welcome everyone who came to our earlier than usual opening night on 13th August 2026, especially the new members. If you entered your email address on the club home page you should receive these blog entries that describe our meetings. You can also follow group activities by joining our member-only Facebook group: https://www.facebook.com/groups/25703565185901411. Ask our web master, Elaine Gilroy, for an invitation.

You will find our 2026-2027 programme on the club website: https://musselburghcameraclub.org.uk/programme-2026-2027/.
There are also monthly outings and photoshoots which are listed on our activities page: https://musselburghcameraclub.org.uk/club-activities-2026-2027/,
but you’ll find the most up to date information and chat about each activity on our Facebook pages.

The club web site contains a collection of tutorials on photography that our chair has added over the years:
https://musselburghcameraclub.org.uk/introduction-to-photography-presentations/

Information on how to enter the club competitions can be found here (or you can just ask George Todd, our competition secretary). Competition images are normally emailed to George at georgetodd1957@me.com:
https://musselburghcameraclub.org.uk/competition-information/


We meet at 7pm each Thursday evening. Come along tonight for a joint meeting with Penicuik Photography Club and Haddington Camera Club, where you’ll be able to browse the images made for the 50mm North Berwick challenge. You will be able to vote for your favourite image, and there might even be a prize for the overall favourite. There will also be an A2 print of a North Berwick Scene where you can “Spot the Seagull”.

Welcome to to the club. A year of exciting photographic activities lies ahead of us.

30 April 2026 (AGM and Presentation of Trophies)

The 2025/26 Musselburgh Camera Club season ended on 30th April 2025 with the AGM and the presentation of trophies. Teas, biscuits and cakes were provided by Jennifer Davidson and Liz Sowler, with help from Karen Woodcock, Jim Innes and others. Although the AGM is our last meeting at the Fisherrow centre this season, we are planning a series of activities through the year, so watch out for notifications or check our latest activities page. The club has a private Facebook page which members can join to be notified about events and to chat during the summer. Click the link below to chat or request to join (you’ll need a Facebook account):

https://m.facebook.com/groups/25703565185901411

Members had an opportunity during the evening to suggest and vote for the topics for next year’s set subject tournament. The top results were:

  1. Travel
  2. City Lights
  3. The Perfect Panorama

which become the themes for next year’s set subject rounds 1, 2 and 3. The AGM finished with a presentation of trophies and medals. The full list of trophy and medal winners can be found on the following page. Well done to all of this year’s winners!

Trophy Winners – 2025/2026

Our club will be hosting a visit by Mölnlycke fotoklubb members on 14th, 15th and 16th May this year. The current plan for their 3 day visit is as follows:

Please watch out for notifications and come along to the activities. Thank you to Ed Robertson, Gavin Marshall and Charlie Baird for offering to help with transport.

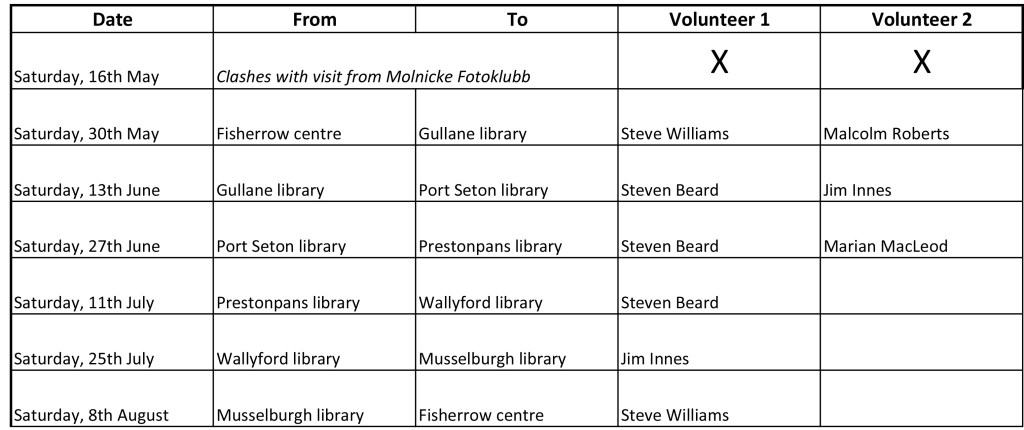
The club’s exhibition will be touring local libraries during the summer. Here is the current timetable and list of volunteers. Thank you to everyone who volunteered so far. Please let Steven or Ed know if you would like to volunteer for the 11th July, 25th July or 8th August slots.

We agreed at the AGM to start the next season 3 weeks earlier than usual, so the first meeting of the 2026/27 season will be on Thursday, 13th August 2026. I look forward to seeing you there.

23 April 2026 (Photo Scavenger Hunt)

Our last meeting of the season was a photo scavenger hunt. Members were given the task of capturing exactly 6 photos in and around the Fisherrow Centre inspired by 6 challenges:

  • The Fisherrow Centre used to be a school, so take a shot that reminds you of school.
  • The walls have just been painted blue, so take a shot of something blue (but not the walls).
  • Let’s see a shot that contains converging lines.
  • This is the end of another photography session, so show something coming to an end.
  • Pick a familar object but show it from a angle that makes it look unusual or unfamilar.
  • Surprise us with a creative shot.

We spent an hour exploring the area and then returned to show the images we had captured. Some members had stayed in room G3, while others had explored the Fisherrow Centre and its grounds, but some intrepid members had ventured as far as the river Esk and Fisherrow beach. The most popular image was the “Girls Entrance” sign, which came up again and again. There were also creative shots of signs, door locks, stairs, flowers, pigeons and gable ends viewed from different angles. It was a fun evening to end our 2025/26 season.

  • The club needs volunteers to help transfer our summer exhibition between libraries on the following dates. Please let Steven or Ed know if you would like to volunteer:
    • Saturday, 11th July: Prestonpans library to Wallyford library (one volunteer needed).
    • Saturday, 25th July: Wallyford library to Musselburgh library (one volunteer needed).
    • Saturday, 8th August: Musselburgh library to Fisherrow centre (one volunteer needed).
  • Next Thursday (30th April) we have our club AGM and prize-giving, which starts at 7pm in room G3. This time we will be starting with refreshments, so please come early if you can and pick up a cup of tea or coffee before we start. Please bring along your ideas for next year’s set subject themes, or email them to Ed if you can’t attend the meeting. See you on Thursday.

02 April 2026 (3-Way Interclub Competition)

This week we hosted our annual 3-way interclub competition with Haddington Camera Club and Penicuik Photography Club. The competition was judged by artist and photographer Colin Joyce. Each club submitted 15 images each, making a total of 45 images. Colin said all the images submitted were good, and he was only judging them against each other. He described what he liked about each image and suggested how some images could be improved (e.g. by darkening a bright distraction or changing the crop). During the first half, Musselburgh managed to secure best image, with Derek Muller’s “Running Against The Clock” getting 20 points. But Penicuik managed more 18s and 19s and at the end of the first half were ahead of Musselburgh by 138 points to 136, with Haddington close behind at 133 points. The second half began with Penicuik securing another 19 points and pulling further ahead, and they remained in the lead until the second to last round, when George Todd’s “Frosted Whiskers” secured 18 points and brought us level. Then, in the final round, Penicuik scored 18 points with their lovely image “Grey Seal Pup”, but Derek’s “Beauty can be Fragile” portrait scored 19 points and clinched a win for Musselburgh at the last moment. We celebrated by sharing a lavish feast of sandwiches, cakes, scones and hot cross buns with our guests. The final scores were:

  • First place (260 points) Musselburgh Camera Club
  • Second place (259 points) Penicuik Photography Club
  • Third place (250 points) Haddington Camera Club

The top Musselburgh images were:

  • Running Against the Clock (Derek Muller)  – 20 points
  • Between the Poles (George Todd) – 19 points
  • Beauty Can Be Fragile (Derek Muller) – 19 points
  • Strength Against the Current (George Todd) – 18 points
  • Brown Hare Boxing (Jennifer Davidson)  – 18 points
  • Frosted Whiskers (George Todd)  – 18 points

Well done to Musselburgh Camera Club, and especially Derek, George and Jennifer. Thank you Colin for judging and thank you to everyone who helped with the catering. Our guests really liked the spread.

  • Next week Charles Everitt will be visiting Musselburgh Camera Club to tell us about Inchkeith Island.
  • If you are interested in submitting prints to the SPF Annual Portfolio and being part of our club entry, please send JPEG copies of your intended entries to George Todd. George can advise you what to do next. Entries need to be chosen, printed and submitted by 1st May 2026.

26 March 2026 (Set Subject Round 3 – Comedy)

The last of our 3-part set subject tournament concluded this week, on the theme of “comedy”. We finished round 2 with Derek Muller 5 points ahead. Here we find out if any of the remaining contenders can score enough points to catch up. The competition was judged by Jim Innes, a top scorer in last year’s competition. There were 33 images entered by 11 members. Jim said that the “comedy” theme had been quite hard to judge because everyone had different idea what was funny. He judged each entry on the quality of the image, how funny it was, and how well the title helped the comedy. As usual, members had been very creative in their entries. There were images of comedic acts from the theatre or the Edinburgh festival, including George Todd’s photograph of a comedy act between 2 dogs in costume. There were also comedy wildlife images, pictures of people doing silly things, a comedy still life with googly eyes, and some pictures of fellow club members in silly costumes or jostling to get their camera in the right place. Malcolm Roberts’ photoshopped version of Musselburgh’s “Honest Toun” road sign raised a laugh. Jim commented on the composition, exposure and sharpness of each image and whether he found it funny. Some entries had a funny title but didn’t seem funny in themselves. Nicola Cawthorne’s “Brown Bag Lunch” became funnier after the competition had finished, when we zoomed in to discover that the “lunch” is actually a pigeon! The top scorers were (in reverse order):

  • 4th place (49 points)
    • Elaine Gilroy
    • Carol Edmond
  • 3rd place (50 points)
    • Malcolm Roberts
    • Mike Clark
    • Derek Muller
  • 2nd place (54 points)
    • John Fowler
    • George Todd
  • 1st place (56 points)
    • Steven Beard
    • Jennifer Davidson

The top images were:

  • The Fruit of All Evil (Steven Beard) – 20 points
  • Help! I’ve Got An Itch! (Jennifer Davidson) – 20 points
  • What Time Is It? My Watch has Stopped (George Todd) – 19 points
  • I Just Need One More Shot (Jennifer Davidson) – 19 points
  • Peeping Penny (John Fowler) – 18 points
  • Hurry Up (John Fowler) – 18 points
  • Ready Steady Woof (John Fowler) – 18 points
  • Funny Faces (Steven Beard) – 18 points
  • How Are You Doing That? (Steven Beard) – 18 points
  • Joe Relaxing At Home Circa 1946 (George Todd) – 18 points
  • Sharing A Moment (Mike Clark) – 18 points
  • This Isn’t Mean to be Funny (Elaine Gilroy) – 18 points
  • Call Yourself Photographers (Derek Muller) – 18 points

Well done to Steven Beard and Jennifer Davidson, who won this round with a 20 point image each. They both win the right to judge next year’s competition. Jennifer judged this competition 2 years ago, so it looks like Steven will be judging. After consulting the final spreadsheet I can reveal that the final result from all three competitions is:

  • 1st place
    • Derek Muller (53 + 56 = 109)
  • 2nd place
    • George Todd (54 + 54 = 108)
    • Jennifer Davidson (52 + 56 = 108)
  • 3rd place
    • Steven Beard (51 + 56 = 107)
  • 4th place
    • John Fowler (51 + 54 = 105)
  • 5th place
    • Mike Clark (54 + 50 = 104)
    • Carol Edmond (51 + 53 = 104)
  • 6th place
    • Malcolm Roberts (51 + 50 = 101)
    • Jim Innes (49 + 52 = 101)

George and Jennifer almost made it, but they couldn’t quite reach Derek Muller’s unassailable 109 points. Congratulations to Derek, who wins the trophy. Jennifer and Steven came from behind, which shows how everything can change after the 3rd round.

  • This is the last competition of the season, and George needs to engrave the trophies for the AGM. If you won a trophy last year please return it to George as soon as possible.
  • Next week we will be hosting Haddington Camera Club and Penicuik Photography Club for the 3-way competition. If you have any spare home baking or other treats to share please bring them along.

05 March 2026 (Swedish Interclub Meeting)

For our first meeting in March 2026 we were delighted to be joined once again by members from Mölnlycke Fotoclubb, in Gothenburg, Sweden. The meeting was hosted at the Fisherrow Centre and Mölnlycke Fotoclubb members joined us by Zoom.

The evening began with Musselburgh members reviewing the 20 images submitted by Mölnlycke Fotoclubb. Some images had intriguing titles (e.g. “New Life and Dead”) that lead to a discussion about their meaning. The images demonstrated the wide range of styles of Mölnlycke Fotoclubb members. There were beautiful landscape images, portraits, candid street photography, wildlife photographs and some highly creative examples of photographic artworks. Musselburgh members voted for their favourites, and the most popular images were:

  • 1st place (8 votes)
    • A stark, long exposure, black and white shot of sea stacks photographed in the Hebrides.
    • A unusual, moody shot of a dramatic sky with black sand, photographed in Iceland
  • 2nd place (6 votes)
    • A lovely portrait of a woman in Laos, with fantastic skin detail.
    • A wildlife shot of 8 black-throated loons interacting.
  • 3rd place (5 votes)
    • A lovely shot of a cute red squirrel posing reflectively in a tree.
    • A bold and intriguing abstract artwork called “Winter Tree”.

Mölnlycke Fotoclubb members then commented on our 20 images, and their favourites were:

  • 1st place (9 votes):
    • The School Run (Jim Innes)
  • 2nd place (7 votes)
    • Lost in Thought (Ed Robertson)
  • 3rd place (6 votes)
    • Nothing Left To Give (Derek Muller)
    • Black Tailed Godwit (Nicola Cawthorne)
  • 5th place (5 votes)
    • Explosive Flower (Rick Riley)

Well done to Jim Innes, whose portrait of a mother in the Netherlands transporting her children on an unusual bicycle was declared our winner!